DIY Campervan: How to Install a Shore Power Inlet in Your Campervan
- Horacio Ramírez
- Jul 6, 2024
- 2 min read
Updated: Sep 15, 2024
Having a reliable power source while on the road can make a world of difference in your comfort and convenience. In this step-by-step guide, we will walk you through the process of installing a shore power inlet in your DIY campervan, ensuring you can stay powered up wherever your adventures take you.

Materials You Will Need
Before you begin the installation process, gather the following materials:
Shore power inlet kit
Electrical wire (appropriate gauge)
Wire strippers
Wire connectors
Drill and drill bits
Screwdriver
Caulk/sealant
Step 1: Plan Your Installation
Before starting, plan where to place the shore power inlet socket and how to route the wiring. Choose an accessible location for the socket on the exterior of your van, preferably near where you want the power to be distributed inside the van. Gather all necessary tools and materials to ensure a smooth installation process.
Step 2: Install the Shore Power Inlet Socket
Mark the Location: On the exterior of your campervan, mark the spot where you will install the shore power inlet socket.
Drill the Hole: Use a drill and the appropriate bit to create a hole for the inlet socket. Ensure the hole matches the size required for your specific socket.
Step 3: Wiring the Socket to the Circuit Breaker
Route the Wires: Inside the van, route the electrical wire from the shore power inlet socket to the location where the circuit breaker will be installed.
Strip the Wires: Use wire strippers to strip the ends of the wires, exposing the conductors.
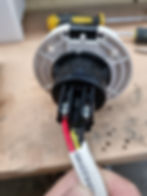
Connect to the Socket: Connect the wires to the shore power inlet socket terminals according to the manufacturer’s instructions. Typically, this involves connecting the live, neutral, and ground wires to their respective terminals.
Install the Socket: Insert the shore power inlet socket into the hole and secure it with screws. Apply sealant around the edges to prevent water infiltration.
Step 4: Connect the Circuit Breaker to the Van’s Electrical System
Connect to the Circuit Breaker: Attach the wires from the shore power inlet socket to the input terminals of the circuit breaker.
Distribute Power: From the output terminals of the circuit breaker, run wires to your van’s electrical distribution panel.
Step 5: Test the Installation
Check Connections: Double-check all connections to ensure they are secure and correctly wired.
Use a Multimeter: Use a multimeter to check for continuity and correct voltage.
Power Up: Connect the shore power cable to a campsite power outlet and plug it into the shore power inlet socket on your van.
Test Appliances: Test your appliances and outlets to ensure they are receiving power correctly.

Step 6: Final Touches
Secure Wires: Use cable ties or clips to secure all wires, preventing them from moving around while driving.
Seal Holes: Ensure any holes drilled for wiring are properly sealed to prevent water infiltration.
Label Components: Label the circuit breaker and any other important components for easy identification.
Installing a shore power inlet in your campervan is a valuable upgrade that enhances your van's functionality and convenience. By following this step-by-step guide, you can safely and effectively add shore power capability to your van. Always prioritize safety and, if in doubt, consult with a professional electrician.